

2003 Audi A4 1.8 Spark Plug Gap
I am a big car enthusiast who loves driving around in Volkswagens and Audis.

All only the nigh negligent of car owners keep upwardly with the automobile-care nuts: changing your oil, keeping your automobile clean, filling up with recommended gasoline. A clean, properly lubricated auto is a happy car that keeps you lot happy (off the roadside and out of the garage) for tens of thousands of miles. If you desire to step that up to hundreds of thousands – you'll have to step up your car-intendance game to higher levels of captious, simply relatively easy maintenance.
Spark plugs are a disquisitional and often-overlooked wearable item. Responsible for igniting the air/fuel mix to offset and run your auto, these plugs can sustain sparks from xl,000 to 100,000 volts and run into temperatures between 900 to 1,500 degrees Fahrenheit (about 500º to 800° Celsius).
Depending on the type of plugs in your motorcar (copper, copper-platinum, or copper-iridium), some last longer than others – but all should exist replaced after their recommended apply.
This article covers:
- Spark Plug Basics
- Spark Plug Removal (using an Audi/Volkswagen 1.8T 20-valve engine every bit an example)
- Checking Your Plugs
- Spark Plug "Gap" Measuring and Adjustment (using NGK BKR7E plugs as an example)
- Spark Plug Installation
1. Spark Plug Nuts

x,000-mile NGK BKR7E above new, un-gapped plug of the same blazon.
Manuel Cintron
The opportunity for this article presented itself in the form of tune-up time for my 2000 Audi TT Quattro. NGK BKR7E plugs are a staple of 1.8T enthusiasts. To empathize why we'll cover a bit of Spark Plug 101 (courtesy of NGK themselves).
In addition to materials in their core, spark plugs are also categorized by their "heat range": a measurement of their thermal efficiency. In plain English, past factors like the length of the plug'south "insulator nose" (the white bit at the bottom of the plug), how far it extends from the threaded beat of the plug, and the core of the plug itself affect how "hot" the plug runs.
This is important considering certain engines operate at dissimilar temperatures (oil temp, coolant temp, combustion temp) and not matching your plug accordingly tin mean poor running.
- Also cold a plug won't burn the air/fuel mix efficiently, causing carbon-fouling.
- Too hot a plug risks burning the electrodes, warping the insulators, and potentially damaging the engine.
NGK Breaks Down Plug Heat Ranges
A plug's insulator pattern can have the greatest effect on its oestrus range. A fatter insulator (hands seen in the NGK-video at one:01) ways a colder plug.
NGK'due south BRK7Es are a expert heat range for stock turbos, just tinkered i.8Ts. Though near all plug cores contain copper for its superb conductivity, the 7Es are chosen "copper plugs" because they don't employ platinum or iridium plating in their core, though the copper is all the same plated (fully-exposed copper would burn in minutes). Platinum and iridium in spark plugs increment longevity, at some cost to conducting efficiency.
Iridium and platinum plugs can get forty,000 to 50,000 miles hands, and cost more for that reason. The 7Es should be changed every ten,000 miles to be conservative, but provide a superb spark for my engine type (and are very piece of cake on the wallet).
Scroll to Proceed
Read More from AxleAddict
two. Spark Plug Removal

Requite your engine some cool-down fourth dimension before swapping spark plugs. A cool engine-head is skilful for installing plugs (and your hands will cheers).
Manuel Cintron
This process will differ from engine to engine, but the gist will be the aforementioned:
- Access and remove the plug-wires (on older cars) or cylinder roll-packs (on newer cars like the TT)
- Alter the spark plugs
- Reinstall your plug wires or ringlet packs
Get-go, yous'll want to permit the car absurd. A hot engine head can make over-tightening plugs easier (and burn down you)!
Yous can pull the negative battery cable if you lot'd similar, merely my mechanics and I have swapped plugs and coil-packs without doing so – no problems.
Late-model cars likely involve getting plastic engine-covers out of the way (unless previous owners did away with them), just they typically pop-off or unscrew easily.
Spark plugs differ betwixt engines (some using two per cylinder), but like near new inline fours, the 1.8T uses iv plugs and a coil-pack for each.

Four, screw-in "Hitachi" style coil packs visible on this modified i.8T.
Manuel Cintron
Removal Instructions
- If you're using this as a step-by-step guide for a 1.8T plug service, you'll brainstorm by getting the vacuum reservoir piggy-backing on cylinder 4 out of the way (10mm socket).

Become this vacuum reservoir out of the way by unscrewing its 10mm bolt.
Manuel Cintron
- Then you tin can take a 5mm hex-commodities key ...

Manuel Cintron
- and begin unscrewing the bolts that hold the coil packs down.
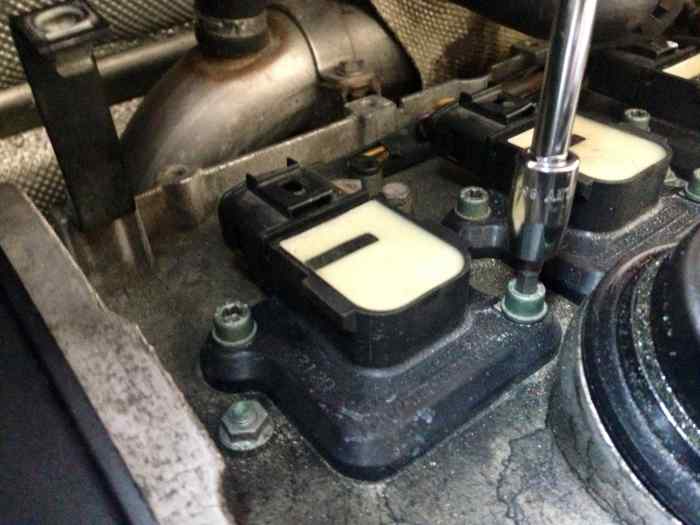
Manuel Cintron
TIP: Go on the bolts of your gyre packs oriented the same mode they were installed. It's a certain way to keep track of valuable bolts. Fifty-fifty though the bolts all have the same thread, years of use may take fabricated individual holes "addicted" of the small nuances from bolt to commodities. And I'thousand superstitious nigh anything that helps make reinstallation easier.
Keeping your curlicue pack bolts in their installation order is a sure way to go along rail of everything.
Manuel Cintron
TIP: If you're looking at your 1.8T and don't run across any bolts, don't worry. There was a blueprint split between early and after 1.8Ts. Later models used in-house Audi/VW push-downwards coil packs instead of the older Japanese-made Hitachis. The spiral-down Hitachis accept a better reputation for longevity, though; screw-down conversions are available from suppliers like ECS Tuning).
- One time all the coil-pack bolts are removed, you can begin disconnecting the packs from the ignition harness.

Fourth dimension to pull the ringlet-pack connectors—carefully!
Manuel Cintron
TIP: Take care to notice the bracket the vacuum reservoir bolts onto – information technology'south screwed on with both of cylinder 4's pack-bolts and one of cylinder 3's.

Manuel Cintron
Depending on the age of your car, this next step can be a chip ho-hum.
- If your engine uses plug-wires leading to a distributor – this should be elementary, pull the plug wires out advisedly (they shouldn't fight you) and set them aside.
TIP: If your automobile uses a single distributor and plug wires, proceed runway of which wires become where! Out-of-gild wires mean that the spark won't go to cylinders that need them at the correct time (your engine may not burn up at all).
- If your engine uses coil packs, like the 1.8T, the plastic harness connectors can exist brittle after being exposed to years of engine heat.
Depending on their condition, your harness connectors may even so have the squeeze tabs that tin be gripped (if you have G.I. JOE's handshake) or "coerced a bit" with an musical instrument like a apartment-head screwdriver.
TIP: Take intendance when using a pick or screwdriver to squeeze the release tabs on the harness connectors! Onetime, heat-ridden plastic is touchier than a college pupil during an election yr!

Manuel Cintron
I've had the butt-puckering moment of having a scrap of plastic seize with teeth the dust, only at least with this generation of Audi/VW connectors – it's not game over nevertheless.
If you just damage the connector'south clipping/releasing tabs, good news: this is a High german-designed part. The guys that helped get united states of america to the Moon. They retrieve things through. Give thanks goodness, they knew some ham-fisted child would be fiddling with it 13 years later on, trying to keep his car going.

Thank you, Audi/Volkswagen!
Manuel Cintron
The insides of the connectors have rubber seals that provide most of the gripping action to the coil packs, and the squeeze-tabs were an (admitting frustrating) redundancy. I hope the engineers of your automobile have your back the aforementioned way.
- With bolts and connectors out of the style, these screw-down curlicue packs come out with a gentle tug and a slight popping sound.

22,000-mile curl packs. The white build-up on the firing end is normal.
Manuel Cintron
This is a good fourth dimension to inspect the condition of your packs. A small-scale white ring effectually their tips is normal. These scroll packs have around 22,000 miles on them and were recently replaced after two of the 118,000-mile, thirteen-twelvemonth-onetime originals finally bowed out.
Signs of a diddled coil pack can include:
- a sudden kick (while driving)
- loss of power
- dim gauges and lights (fewer running cylinders means less alternator ability)
- poor idling (like a popcorn maker, due to the uneven firing)

Coil Packs. (From left) Cylinders 4, 3, 2, and 1.
Manuel Cintron
TIP: Like the bolts belongings them downwardly, I like to keep the coil packs in the gild they were installed in. If for zero else, this can aid with future diagnosing of ignition bug: coil packs consistently blowing in 1 cylinder can bespeak an issue at the engine-side or the wire-harness-side.
Now you're ready to pull the old plugs:
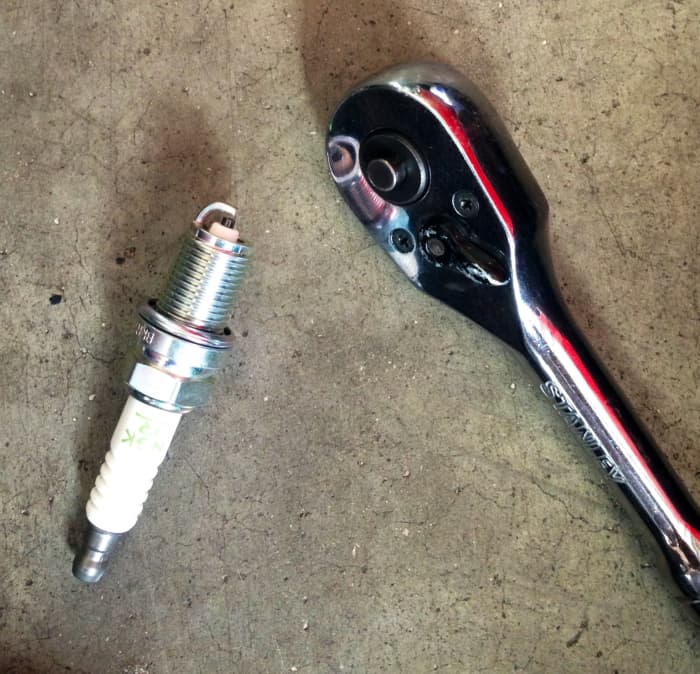
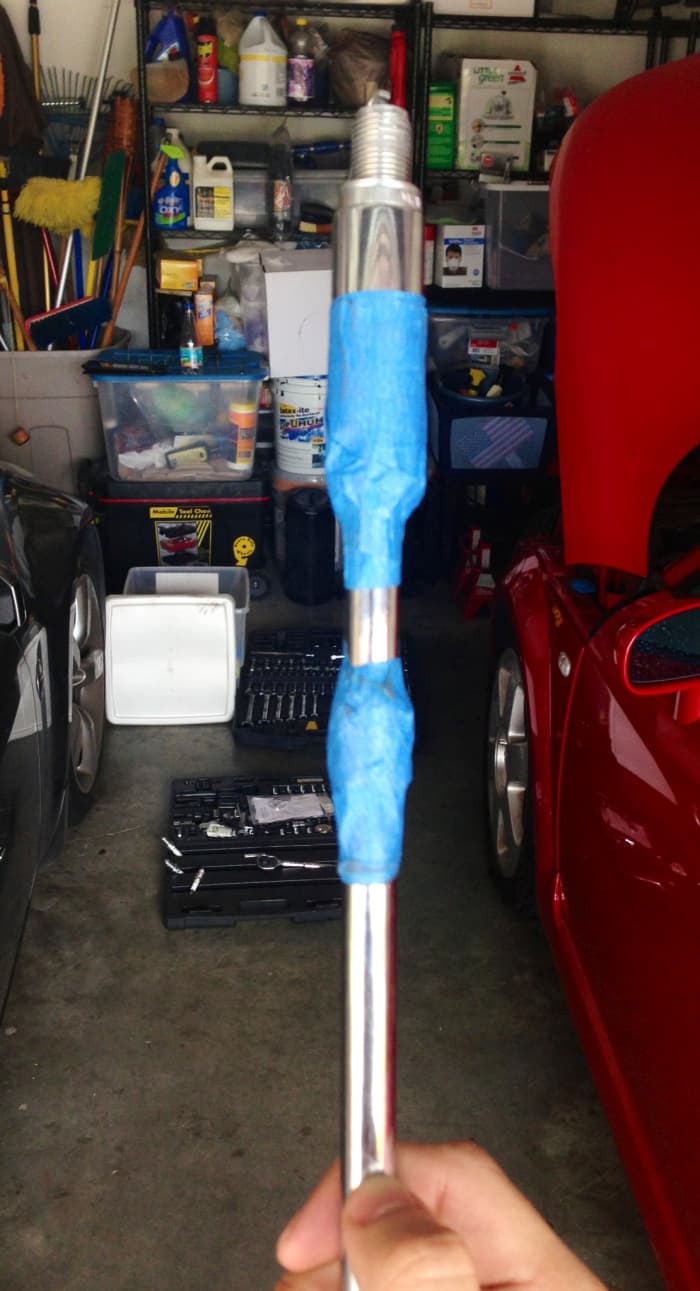
- You'll need a ratchet wrench, a 5/eighth spark plug-socket (which uses a safe-insert to grip plugs), socket extensions, and—a flim-flam I picked upward from my Mazda days—painter'southward tape.

Manuel Cintron
- Have the socket extensions and wrap the tool where the socket and lower extensions meet.
This keeps your socket and extensions from coming apart when you give a premature tug to a plug that isn't fully unscrewed.
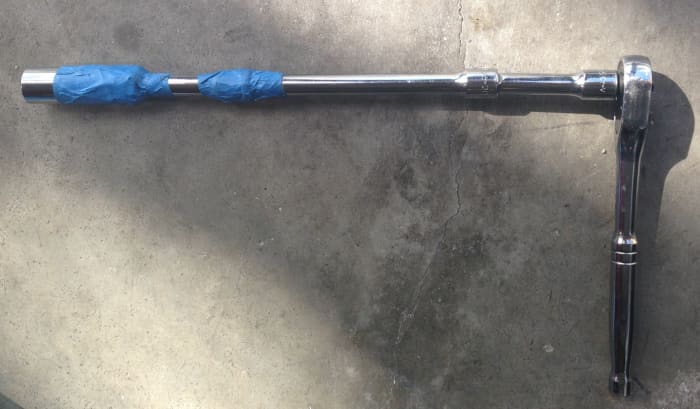
Tape is an often-joked-about mechanic tool, but sometimes, it'southward as serious equally a middle set on.
Manuel Cintron
If your extensions and sockets don't grip well, they can split and force y'all to play the needle-nose pliers game (which sucks). A poor quality plug socket can cause this also if its rubber insert pops out easily.
With your plugs out, y'all can take advantage of a valuable opportunity:
- Check the status of the used plugs. The condition of your plugs can betoken the condition of your engine.
iii. Checking Your Plugs
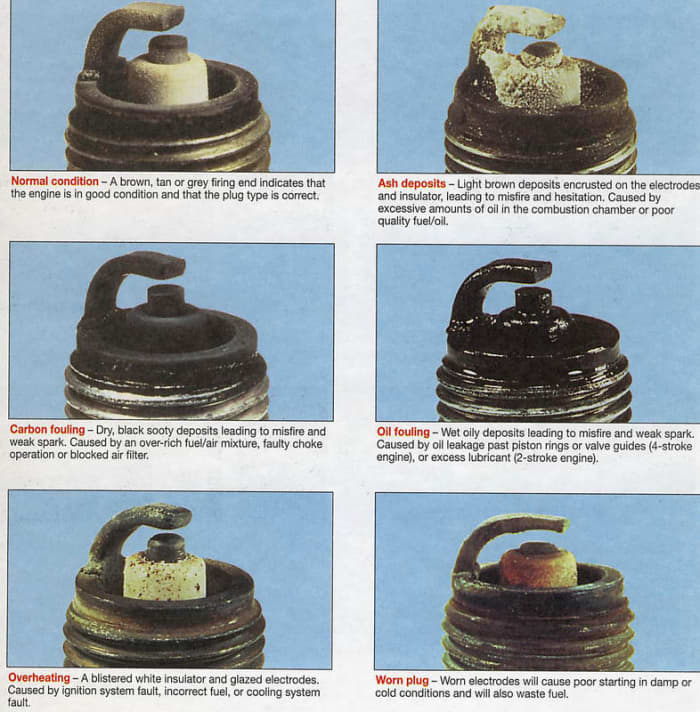
Charts like these are available all over the internet. Type "Spark Plug Condition" into search engines to find others.
SpyderLovers.com
- Besides black and sooty? You're running rich or too-cold plugs.
- Oil-soaked plug tips? Some of your piston-rings or valve-guide-seals are highly worn.
- Does the plug tip look like you stuck information technology in a blender? The cylinder is "pre-igniting" (a.k.a.: "detonating," "pinging," or "knocking") or the plug is likewise long and contacts the piston.
Fortunately, these plug tips here look good, with an insulator that'southward still pretty white, and tan-to-grayish deposits on the electrode tips.
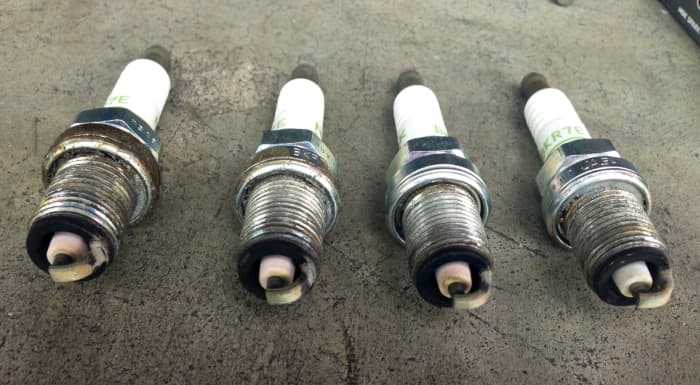
These plugs are looking A-OK, luckily. A pretty-make clean insulator and tan-to-gray deposits on the electrodes. NGK says a bit of grime by the "hex" above the threads is normal and caused by static charging when firing. Stale anti-seize on plug four.
Manuel Cintron
TIP: If yous have plugs out and you see a cherry tint on the insulator and tip—don't panic only still! Detergent additives in lower-grade (no proper name) gasolines, or octane boosters like Aureate Hawkeye's 104 performance additive, tin leave a ruddy tint on the plugs.

Used plug from a previous swap next to new plug. Ruby-tint acquired by Gold Eagle 104 Octane Booster. No problem.
Manuel Cintron
If you're interested, Gold Eagle's 104 is a good store-bought octane booster that raised octane as much as three full points in mag tests (91 to 94 for example). Information technology also lacks MMT, an older octane remedy that works fine in regularly rebuilt race engines, simply can damage street auto parts like oxygen sensors and catalytic converters, and the environs.
If you like, yous tin can keep track of which used plugs ran in which cylinders (this tin assistance track engine status).
NGK plugs come in individual boxes inside the iv-pack box, which tin help yous catalog used plugs.
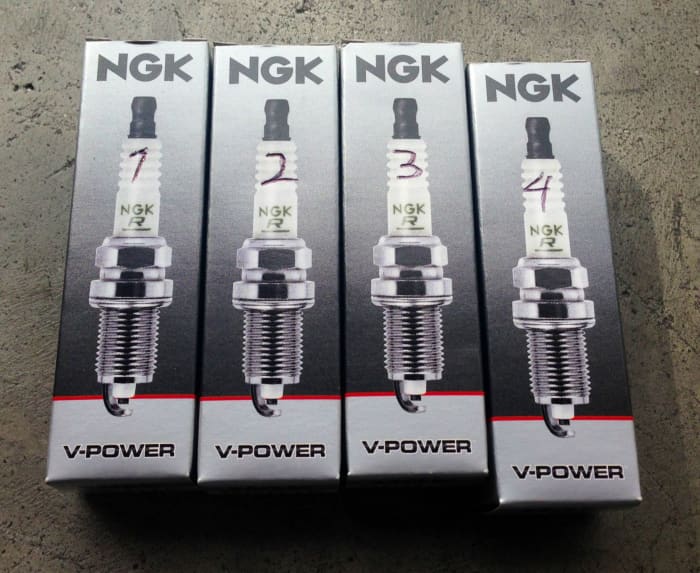
Keeping track of what cylinders your used spark plugs were in can aid future trouble-shooting.
Manuel Cintron
The back of the box also has helpful suggestions for plug-torquing when installing the new units. Their suggestions are specific to the type of plug and type of engine head. It's a skilful idea to bank check your car manual or online resource in case your engine differs).
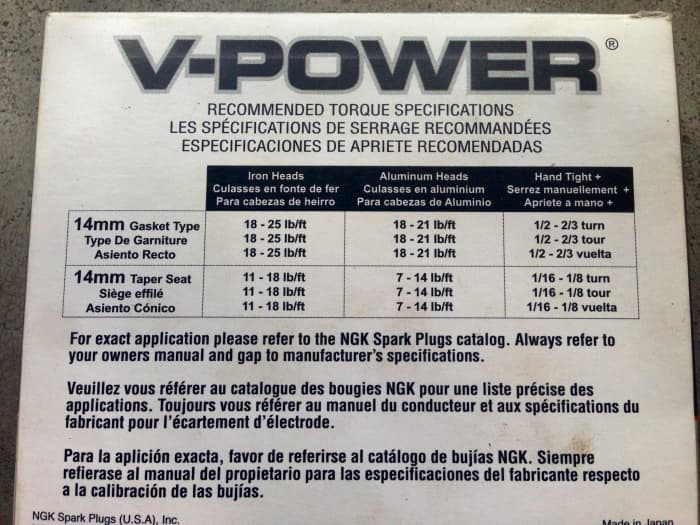
NGK spark plug-installing suggestions. Check your manual or online community to observe your specs.
Manuel Cintron
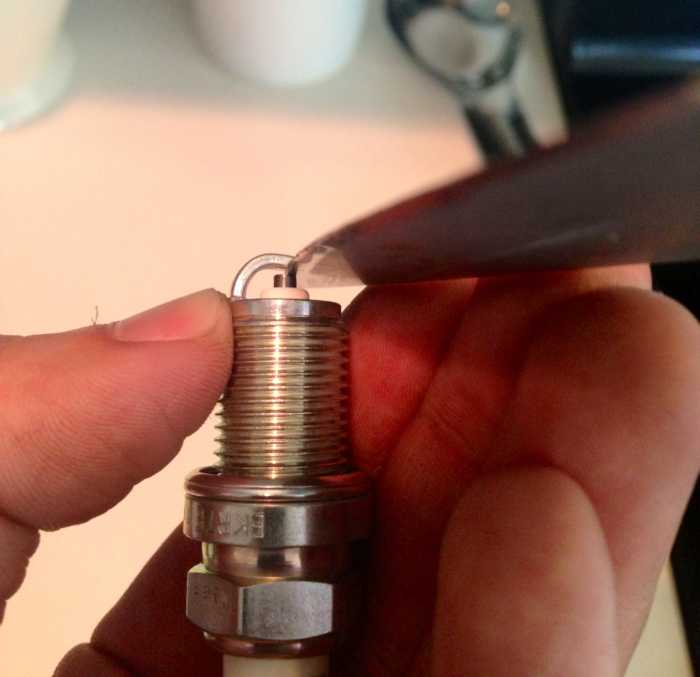
4. Measuring and Adjusting the Spark Plug Gap

NGK BKR7Es come pre-gapped to 0.35-inches.
Manuel Cintron
Before installing the new plugs, it's a good idea to bank check their gap if your engine setup requires special adjustments. A spark plug's gap is the distance between its core electrode and its "basis electrode—between its tip and the curved arm beneath it. Adjusting this gap affects the nature of the spark it provides likewise as its heat range.
For this, you'll need a gapping tool. At that place's several kinds, similar the money type I used, likewise as feeler-blade and wire styles.
The latter 2 are considered more than accurate past the elite, just I've used the coin type for several plug changes without issue. Employ what makes you feel comfortable.
Gapping Instructions:
What is necessary with fine-wire plugs like the BKR7Es is a gentle, patient bear on.
- When measuring with a money-way tool, insert the thinnest side between the ground and core-tip first.
- Slowly move the tool forth its increasing curvature until yous meet with gentle resistance. The 7Es come pre-gapped to 0.35-inches. I know that in my case, a gap of 0.28-inches with this plug is ideal.
Subsequently all the talk of gentleness, this may sound strange:
- Y'all can suit the gap by holding the plug on the footing (tip-side-up) and gently tapping the ground electrode with a wrench-head.
If you have doubts, I picked this up from an Audi/VW specialist (a source for an earlier article on MK.Four cars).
- For peace of mind, you can place a small towel betwixt the ground and plug to absorb some force.
You can adjust your spark plug gap by borer the footing electrode—gently—with your ratchet-wrench head.
Manuel Cintron
TIP: Gently. Gently! I brainstorm with three soft taps, measure the gap again (that normally brings it down to 0.thirty inches), then follow up with two taps (and another tap or two) until I achieve 0.28-inches.

Gapped to 0.28 on the dot.
Manuel Cintron
If this is your first time gapping, gauge the Thor-like power of your taps by tapping one time and measuring before continuing. If you go too far, stay calm! With more gentleness than your taps, a fine-bladed knife tin get you lot out of this—slowly increasing prying force to open the gap.
Manuel Cintron
five. Spark Plug Installation
In one case all plugs are gapped, they're about ready for installation. Because of the difference between metallurgy in the plugs and engine head, thermal behavior over time can brand plugs aggrandize and contract until they're pretty snug come up changing time. "Anti-seize" helps prevent this.
Creating a school-principal-similar bulwark betwixt the teen-like-affection of the plug and the engine head is a bit of extra insurance – though NGK says their special "trivalent" plug coating (what gives them a chrome stop) already takes care of this, and that adding anti-seize can cause "over-tightening or trap corrosive wet."
- If y'all use anti-seize, place a drop on a gloved fingertip and run information technology across the threads from the bottom up (this stuff can irritate skin; try to avoid the electrodes). Practice it right and you lot shouldn't discover any anti-seize on the threads.

Manuel Cintron

Apply a q-tip or wear a glove when applying anti-seize to spark plug threads. It tin irritate your peel.
Manuel Cintron
I install my NGK plugs like I'g handling baby-birds to prevent over-torquing them. Everything with restraint and commonsense.
- Remove the taped plug socket and extensions from your wrench.
- With the plug in the socket, insert the plug into the engine head and gently begin threading it by hand.
Use but the socket and extensions to brainstorm installing the new plugs. Hand tightening helps lessen the risk of cantankerous-threading!
Manuel Cintron
- If the plug has caught the threads correctly, the first few twists should only need your pollex and index finger.
TIP: Accept care not to cantankerous-thread the plugs! If you've ever put the cap dorsum on a bottled potable, but to have information technology screw on awry and so suddenly snap into identify – that was cantankerous-threading.
With your insignificant bottle-cap, the flexibility of the plastic lets it pop back onto the correct threads. With your valuable spark plugs (and crazy-expensive engine-head), this won't happen. The threads on both will eat into each other incorrectly and seize, and so you volition know Hell.
- Once y'all've hand-threaded the plug, you tin can popular the ratchet wrench onto the extensions and torque them to spec.
- A torque wrench and soft grip brand for text-volume installation, but in a pinch, it works to turn the ratchet at its head, one-handed, until in that location is resistance.

Hand-threading the plugs before popping the ratchet wrench on to tighten.
Manuel Cintron
- One time all spark plugs are installed, you tin can begin reinstalling your plug wires or coil packs.
TIP: With the 1.8T engine, reconnecting the ignition harness to each coil-pack may be easier with the packs partly inserted into their holes, non completely in. The connectors are strung together and attached to the valve cover, so they have limited mobility when beingness maneuvered into reconnection. Like the plugs, reconnect them slowly at first to make certain they're slipping on correctly.

Manuel Cintron
- If your engine has screw-in coils, rethread their bolts past hand first (remember the bracket for the vacuum reservoir).
- It's a good thought to start rethread whatsoever screw/bolt by mitt to minimize the chance of cross-threading. So advisedly torque them with the ratchet and 5mm hex key.

Always begin threading past hand when possible!
Manuel Cintron
- Once this is done, the terminal step for the 1.8T is to reattach the vacuum reservoir to its bracket with the 10mm bolt.

Manuel Cintron
- Say a prayer, knock on woods, and plough the cardinal. If all is equally information technology should be, the engine should fire up like before – perhaps even sounding "cleaner" depending on how erstwhile the used plugs were.
- Accept the car out, running hands first to let it aplenty warm-up fourth dimension, then take it through a typical bulldoze at depression and high loads and RPMs (however high that is for you).
If nothing goes incorrect, and any issues caused by suspect plugs are gone, clean your easily and pat yourself on the back. Y'all've inverse your spark plugs and returned a chip of the show-room freshness to your auto.
This article is accurate and true to the best of the author's knowledge. Content is for informational or amusement purposes only and does non substitute for personal counsel or professional advice in concern, fiscal, legal, or technical matters.
© 2013 ManuelCintron
DOWNLOAD HERE
2003 Audi A4 1.8 Spark Plug Gap
Posted by: robbinsoppre1963.blogspot.com
0 Response to "2003 Audi A4 1.8 Spark Plug Gap"
Post a Comment